Some brand new sliding patio doors (usually solid wood core) have been found to leak air where the operating door interlocks with the stationary panel.
This often does not become apparent to the owner until cold weather sets in.
The reason cold air is felt blowing in around this interlock area is because the doors are not fully interlocked and the weather seal is not fully engaged. This can occur even if the operating door is fully closed and securely locked.
The cause is due to the fact that the patio door system is likely about 1/4" too wide for the opening, the door was installed to be plumb and not square (and a 1/4" was lost)... or, the manufacturer made one or more of the components a little too wide and the installer did not have enough of a financial cushion in the job to take the time to correct the error. http://www.dehavenconstruction.com/vinyl-window/window-installation-errors-problems.php
The solution is to remove the stationary panel, plane the vertical jamb side and replace.
Tuesday, January 7, 2014

Friday, December 27, 2013
MULTI-POINT LOCKS
Multi-Point locking mechanisms used on sliding patio doors have been manufactured by Truth, Marvin, Fuhr, Hoppe or a half dozen others. When the door is fully closed, the thumb turn latches at two, three or more points into or around keepers in the jamb.
Fifty percent of the time, maintenance issues with these high-security style locks can be contributed to the keepers, which may just be out of adjustment or alignment.
With these designs, the thumb turn cannot move the latches until the door is completely closed and a "plunger", protruding from the jam, presses against a "trap door" on the face of the mechanism, which releases the latches to move into place... thus, locking the door.
Or, with some manufacturers, the door handle needs to be held down as the door is closed in order to release the latches... and, then the latches can engage the keepers when the handle is released.
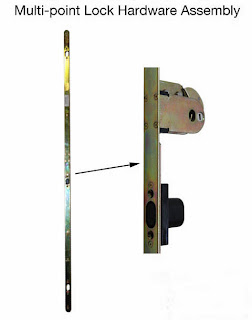
The other half of the time, maintenance issues are the result of bent latches or components internal to the locking mechanism. This usually happens when someone has tried to adjust the keepers or they gradually moved out of adjustment over the years. When the person closed the door and twisted the thumb turn to move the latches, the latches did not fully catch the keepers. Then, opening the door without twisting the thumb turn back to return the latches to the open positions, the door was closed again and the keepers hit and bent the mechanism which was still in the closed position.
You can take the entire mechanism apart and play with it for a couple of hours and you might be able to straighten out the bent components. But, you are better off just buying a whole new mechanism for a few hundred bucks.
Note: When ordering a new multi-point mechanism, you will need to measure the length, width, offset and possibly several other dimensions. The right one is not hard to find on the Internet.
Replacement of the entire mechanism can take less than one half hour and adjusting the keepers can take up to another half hour. Suggestion: Remove the keepers and then replace individually to adjust them one at a time.
Fifty percent of the time, maintenance issues with these high-security style locks can be contributed to the keepers, which may just be out of adjustment or alignment.
With these designs, the thumb turn cannot move the latches until the door is completely closed and a "plunger", protruding from the jam, presses against a "trap door" on the face of the mechanism, which releases the latches to move into place... thus, locking the door.
Or, with some manufacturers, the door handle needs to be held down as the door is closed in order to release the latches... and, then the latches can engage the keepers when the handle is released.

The other half of the time, maintenance issues are the result of bent latches or components internal to the locking mechanism. This usually happens when someone has tried to adjust the keepers or they gradually moved out of adjustment over the years. When the person closed the door and twisted the thumb turn to move the latches, the latches did not fully catch the keepers. Then, opening the door without twisting the thumb turn back to return the latches to the open positions, the door was closed again and the keepers hit and bent the mechanism which was still in the closed position.
You can take the entire mechanism apart and play with it for a couple of hours and you might be able to straighten out the bent components. But, you are better off just buying a whole new mechanism for a few hundred bucks.
Note: When ordering a new multi-point mechanism, you will need to measure the length, width, offset and possibly several other dimensions. The right one is not hard to find on the Internet.
Replacement of the entire mechanism can take less than one half hour and adjusting the keepers can take up to another half hour. Suggestion: Remove the keepers and then replace individually to adjust them one at a time.
Thursday, December 19, 2013
WINTER WEATHERSEAL
If you are feeling a draft from under your sliding patio door on those icy winter nights, it is likely that your weatherseal has worn away or been stolen by gremlins.
The solution can be as simple as replacing the weatherseal for less money than it is costing you in heating bills each year.
Here are two images of work that was done to replace old defective rollers and missing weatherseal.
BEFORE

AFTER

The solution can be as simple as replacing the weatherseal for less money than it is costing you in heating bills each year.
Here are two images of work that was done to replace old defective rollers and missing weatherseal.
BEFORE

AFTER

Thursday, December 5, 2013
YOUR PSYCHIC HANDLE...
YOUR HANDLE KNOWS...
90% of all sliding patio door handles are designed to only withstand the normal pressure of opening and closing the door when the door itself is in good operating condition.
A loose or broken handle is the first sign that something else is not right. If you replace the handle without determining the underlying cause, which is usually improving the ease at which your door moves, you will be buying another handle in the near future.
A few of the common handle designs can be found at your local home center and the other hundred styles are available to be ordered. Rarely are handles found to be obsolete. http://www.allaboutdoors.com/index.php?cPath=74_80&osCsid=937574de2dc41f93bf2bd7eafe30cce5
Most handles are secured by two or more mounting screws. The distance between the centers of these screw holes is an important factor in locating the correct part.
BROKEN LATCH LEVERS...
Most handles incorporate a latch lever or thumb turn that move the locking latch open and closed. When the door is rolled to the fully open position, no part of the handle should bump into anything.
A "bumper" (or two) is/are usually installed at the jamb or track to prevent the door from opening so far that the latch lever or handle will hit the frame of the stationary panel.
A latch lever or thumb turn should never require much force to move the latch mechanism. Don't force it.
90% of all sliding patio door handles are designed to only withstand the normal pressure of opening and closing the door when the door itself is in good operating condition.
A loose or broken handle is the first sign that something else is not right. If you replace the handle without determining the underlying cause, which is usually improving the ease at which your door moves, you will be buying another handle in the near future.
A few of the common handle designs can be found at your local home center and the other hundred styles are available to be ordered. Rarely are handles found to be obsolete. http://www.allaboutdoors.com/index.php?cPath=74_80&osCsid=937574de2dc41f93bf2bd7eafe30cce5
Most handles are secured by two or more mounting screws. The distance between the centers of these screw holes is an important factor in locating the correct part.
BROKEN LATCH LEVERS...
Most handles incorporate a latch lever or thumb turn that move the locking latch open and closed. When the door is rolled to the fully open position, no part of the handle should bump into anything.
A "bumper" (or two) is/are usually installed at the jamb or track to prevent the door from opening so far that the latch lever or handle will hit the frame of the stationary panel.
A latch lever or thumb turn should never require much force to move the latch mechanism. Don't force it.
Friday, August 30, 2013
DOOR NEEDS A JERK!
A common situation with metal framed sliding doors occurs after a few years when the house has shifted slightly during settling. It's hard to open.
Metal framed sliding patio doors are designed to open with ease and close snuggly between fiber weatherstrips in the vertical channel on the jamb. But, if the jamb tilts just 1/16 of an inch, the channel can be cockeyed just enough to "squeeze" the door more tightly than originally designed.
Now, when you unlatch the door and attempt to open it, it takes a real hard tug to release the door from the channel. This is often too much for the elderly and is often seen in hi-rise condos and 4-season room additions.
There are three different, cost-effective ways this situation can be remedied.
(1) Using an awl, remove the weatherstrip from one side of the channel. The weatherstrip on the other side should be good enough to keep out the cold since there is additional pressure being applied to it due to the misalignment of the channel.
(2) If the vertical channel is securely affixed to the jamb, gently bend the interior channel wall with a "hand-seamer" tool so as to slightly widen the channel from top to bottom. Do not use pliers.
(3) If the whole channel moves when trying to bend just the channel wall, then you need to use a heavy duty "spreading tool". (see video below)
Monday, July 29, 2013
BUILDING A CUSTOM SCREEN
Once the style and color of extruded aluminum framing is selected and precise measurements have been taken, the mitered components are delivered to the job and the screening jig erected for final assembly.


The frame is pressure fit at all four corners.

It is important that all corners be square.

The frame assembly is complete.

Now for the insect screen mesh.

The correct spline diameter is selected.

The mesh is rolled into place.

The spline is pressed into place.

The mesh is neatly trimmed and the handles installed.

Final adjustments are made to the rollers at the bottom.

And, at the top.

Voila! A new sliding screen door.

Wednesday, July 24, 2013
REPAIR OF PLASTIC DOOR TRACK
It is not unusual for someone with a big heel to step on the composition molded track of a sliding patio door system and break off a chunk.

Compatible replacement tracks are virtually impossible to find. But, alas, these tracks can be repaired in less than an hour and be twice as strong as the original.
You will need just a few things... A length of "stainless track cover" cut to the length of the existing track, http://www.allaboutdoors.com/product_info.php?cPath=57_134&products_id=16501&osCsid=e2ca86430627e4bb42f50a429d748dff a 5-Minute epoxy syringe, a tube of steel-filled epoxy putty, several screws, a painter's sanding sponge block and a utility knife.
First, brush and wipe clean the broken area to be repaired.
Then, using screws with a thread diameter no larger than the width of the original track, partially screw them securely, equally spaced, in a line from one side of the break to the other. The screw heads should be higher than the height of the original track.

Using an angle grinder with a metal cutting wheel, (or some other efficient tool) slice off the heads of the screws slightly below the height of the original track.

Using the steel-filled epoxy putty, begin to fill in the spaces between the screws. Full hardening time is about fifteen to twenty minutes. (ambient temperature is a factor)


Then, before the putty fully hardens, using a utility knife, carefully trim excess putty. As the putty gets hard, use the sanding sponge block and shape the repair to closely resemble the original track.


The results are better than the original manufactured product.

Compatible replacement tracks are virtually impossible to find. But, alas, these tracks can be repaired in less than an hour and be twice as strong as the original.
You will need just a few things... A length of "stainless track cover" cut to the length of the existing track, http://www.allaboutdoors.com/product_info.php?cPath=57_134&products_id=16501&osCsid=e2ca86430627e4bb42f50a429d748dff a 5-Minute epoxy syringe, a tube of steel-filled epoxy putty, several screws, a painter's sanding sponge block and a utility knife.
First, brush and wipe clean the broken area to be repaired.
Then, using screws with a thread diameter no larger than the width of the original track, partially screw them securely, equally spaced, in a line from one side of the break to the other. The screw heads should be higher than the height of the original track.

Using an angle grinder with a metal cutting wheel, (or some other efficient tool) slice off the heads of the screws slightly below the height of the original track.

Using the steel-filled epoxy putty, begin to fill in the spaces between the screws. Full hardening time is about fifteen to twenty minutes. (ambient temperature is a factor)

Keep building up the putty into the approximate shape of the original track. The putty shape should be slightly higher and wider than the original track.

Then, before the putty fully hardens, using a utility knife, carefully trim excess putty. As the putty gets hard, use the sanding sponge block and shape the repair to closely resemble the original track.

Finally, run the 5-minute epoxy inside the length of the stainless track cover, place it over the entire original track, including the repaired portion, tap into place from one end to the other with a mallet and wood block. Wait 20 minutes... and, Voila!!

The results are better than the original manufactured product.
Subscribe to:
Posts (Atom)
